
Using the Form Stacks
If you want to make forms in Foundation, you will need the Forms stacks. The Starter pack comes with the basic stacks you need to make a good contact form, but if you want make more elaborate forms, you will need to get Addon Pack 2. This FAQ will discuss ALL of the forms stacks and how they can be used.
Starter Pack Stacks
Form Base Stack
To make forms, you will need to first drag the Form Base stack onto your page. When you do, this is what you will see:

This is where you will set up the form. What email it will go to, Success Message, Alert Message, if you want to send the info to a database or not:

If you check certain boxes in the Form Base stack settings, other options appear, see the options below:
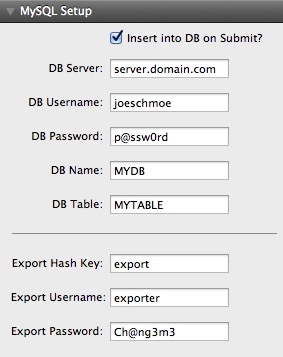
MySQL Settings
Custom Post Settings

Form Field Styles

One thing you should know, some people like to use something like [email protected] or something similar on contact forms. This should work for most servers, but if you are noticing that mail is not getting sent, you might have to change the From email to an actual email.
Text Input Stack
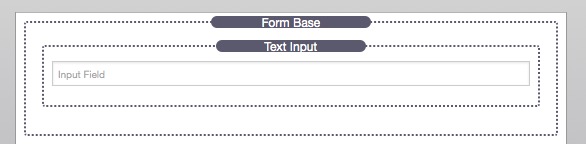
When you add a Text Input stack to your page, you will see the above stack appear. The Text Input Field can be set to be any small text/numeric input field you want it to be. This is the field you will use for First/Last name, email, phone number, address fields or any small sized text field you want (if you want a bigger text field, use the Text Area Stack).

Above are the stack settings for the Text Input stack. Normally Show Label and Validate Field? are unchecked, but since more options appear once checked, we have them selected for you to see the different options available.
Text Area Stack

When you add a Text Area stack to your page, you will see the above stack appear. This stack is used to allow people to enter bigger text, like the main content of a contact form.
Addon Pack 1 Stacks
Checkbox Stack

When you add a Checkbox Stack to your page, you will see the above stack appear. This stack can be used in a list of choices. Users must check the box that is appropriate to their response. This is a very basic stack to setup, just add it, give it a Field Name, a Field Value and a Label name. This stack only adds one checkbox (or Radio button) so if you want a group of options to change from, you have to add more than one of these stacks and set them up appropriately.
Field Set Stack

When you add the Field Set stack to your page, you will see the above stack appear. This stack is used to group common questions or form parts together. You can even name this group and show the name by checking the Show Legend? box in the settings. You will drop all the form stacks you want to use in the Field Set drop zone.
Hidden Data Stack
 The Hidden Data stack is used to ensure certain static data gets sent along with the form submission. For more information on Hidden Data, click here
Label Stack

When you add the Label Stack to your page, you will see the above stack appear. This stack is an added Label look for your forms. These stacks must be used with other stacks, like a Text Input stack inside a 2 column stack like below:

which will give you a page that looks like this:

Number Input Stack

When you add the Number Input stack to your page, you will see the above stack appear. This stack will allow the people using your forms to choose a number from a set of numbers. It can also go in increments you set up, by two's, by five's, by ten's, what ever increment you want use.
Select Box Stack

When you add the Select Box stack to your page, you will see the above stack appear. This stack will allow the people using your forms to select from a group of options. You define the options in the stack settings and the value each option represents.
Slider Stack
 When you add the Slider stack to your page, you will see the above stack appear. This stack will allow the people using your form to select a number based on a slider. The slider can be set to start 1 and end at any number up to 100,000. You can also set how the slider increases in increments. By two's, five's, ten's, or whatever number you want to use, up to 1,000. There are also a lot of good style settings for the slider stack.
This is a good explanation of all of the stacks and settings for the forms stacks.
Now go forth and make your forms great!
Deal of the Week
Latest Updates
Latest Live Stream

Reviewing Foundation 6.2 Update

{{ title }}
Latest Design

© 2025 Weavers Space | Terms of Service | Privacy Policy
