
Easy CMS Guide
This is a walk through guide on how to setup Easy CMS to work on your website.
First thing you need to do is to determine the content you want to use with EasyCMS on your site. Once you have that content figured out, you can then start adding Easy CMS stacks to your content area. If you are redoing a site that is already made, we suggest you do not delete any content, as you can copy and paste that.
The next thing you should realize with Easy CMS is that it uses a programming language called Markdown. It is a very easy to use and understand program language, but some people might be scared of it. If you think you or the clients you are making websites for might be scared to use Markdown, we would suggest taking a look at our Total CMS as that stack has a WYSIWYG editor. Easy CMS does have a toolbar that makes working with Markdown easier (more about that stack down the page), but just wanted to give you a heads up about Easy CMS and Markdown.
With EasyCMS there are only two content stacks, they are Text and Image. Remember, the content stacks are the stacks that have the white background and blue icons. The other stacks are all Admin stack, or stacks that you can use to edit the content.

Making the Content Page
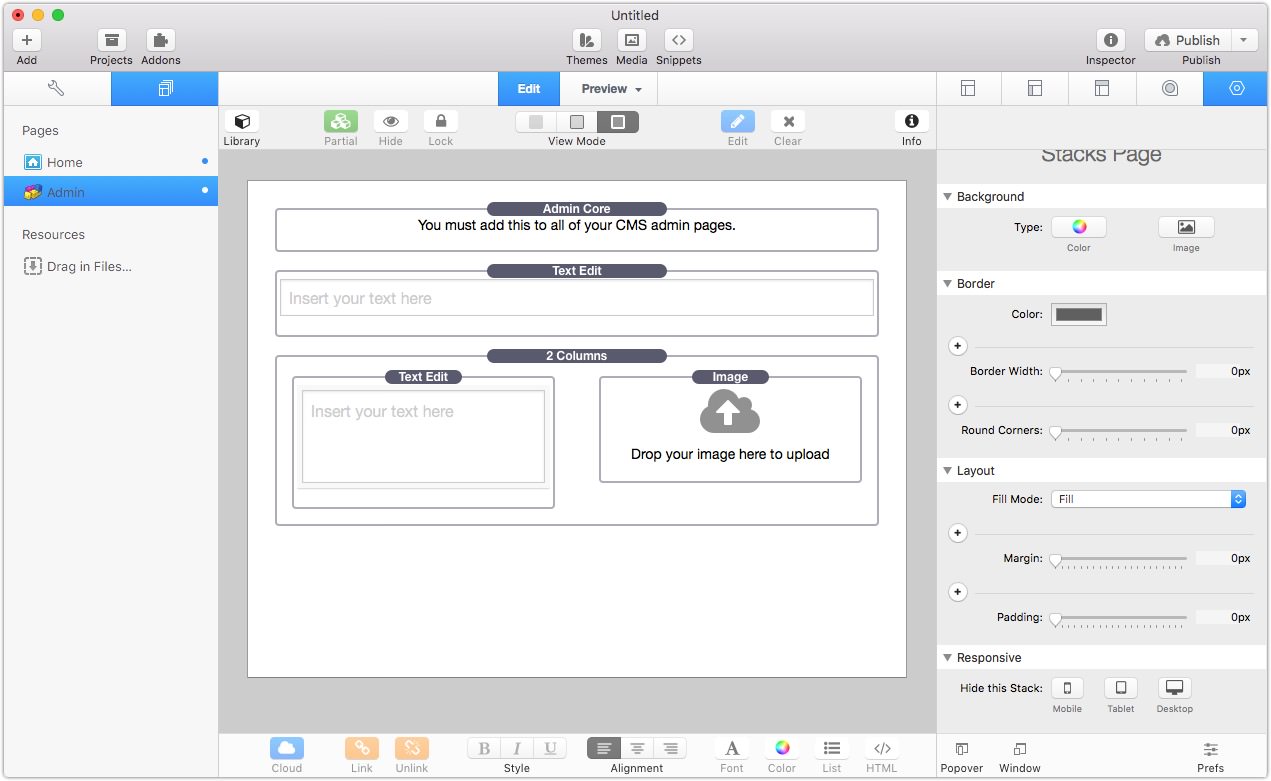
For this example. We are going to be starting a new website. We want to change all of the content on the site, so all of the content stacks we will use will be EasyCMS stacks. Below is our empty page.

We are using the Tesla theme to build this site, so we are using standard stacks to build it. We want our site to have a header above everything, with a 2 column stack below that. In the two column stack we will add an image stack on the right and a text stack on the left. So, using our EasyCMS stacks, it should look like this:

You will also notice that for each text stack we have dropped into the site, we have chagned the setting of each text stack by checking the box Insert Text Macro? so we can give each stack specific CMS IDs.
The text stack on top is for the header, the text stack on the left is for the paragraph text and the image stack is for the image. Once you add your content stacks, the next thing you need to do is to change the CMS IDs so each ID is unique. This is done in the stack settings.

Our suggestion is to name the IDs for what they represent. In the image above, the ID is representing a Header, so we named it header1. Look at our naming scheme. There is no spaces or dashes between the ID and the number. Be sure to use this way, as spaces or dashes will make the CMS not work. We will also name the other text stack on this page to paragraph1.
You will notice in the image below that the IDs inside the stacks in edit mode have now changed. Be sure to check that you do not have any duplicates. If you have a duplicate ID, then the content in those two areas will be the same.

You will also want to give the image on your page a unique CMS ID as well. Click on the image stack and look at the settings. There are a lot of options in the Image stack, so lets go over them now.

CMS ID - This is the ID you need to change for each image stack in your project file. For this example, we will call this image1.
Image Type - This is the option for what your image you are uploading will be. If you are uploading a JPG image, then keep it jpg, if you are uploading a PNG image, then change it to png. Easy CMS can only use these two types of images with the image stack.
Size - When you upload an image in the admin area, Easy CMS actually uploads 3 images, the original image, a thumbnail image and a square thumbnail image. Here is where you can choose which size to use in the content page.
Mobile Image - Lets you choose one of the Thumbnail images for mobile.
Align - Align your image left, center or right. Center is the default setting.
Missing Action - This allows you to determine what is shown if no image is set yet for the page. The default is Nothing which will result in the normal missing image icon. You can hide the missing image until one is set, or you can set a default image that is shown if no image has been set.
Alt - This is the setting for the Alt Tag, an import thing for SEO. The default is to import via Easy Text, or you can manually set it here in the settings.
Align Center on Mobile - Check this box if you want the image centered on mobile.
Auto Lightbox - Check this box if you want to have a Lightbox on your image.
Grow to Container Width - Check this box if you want the image to be as wide as the containter the image is in. For example, if you are using this with Foundation, and just have the image on the page, not in any column stack, the image will go from browser edge to edge.
Add Link - Add a link to your image.
Now that we have the content page all set up, it is time to set the Admin page, where you will go to add the content to your site.
Making the Admin Page
Start by making a new Stacks page.

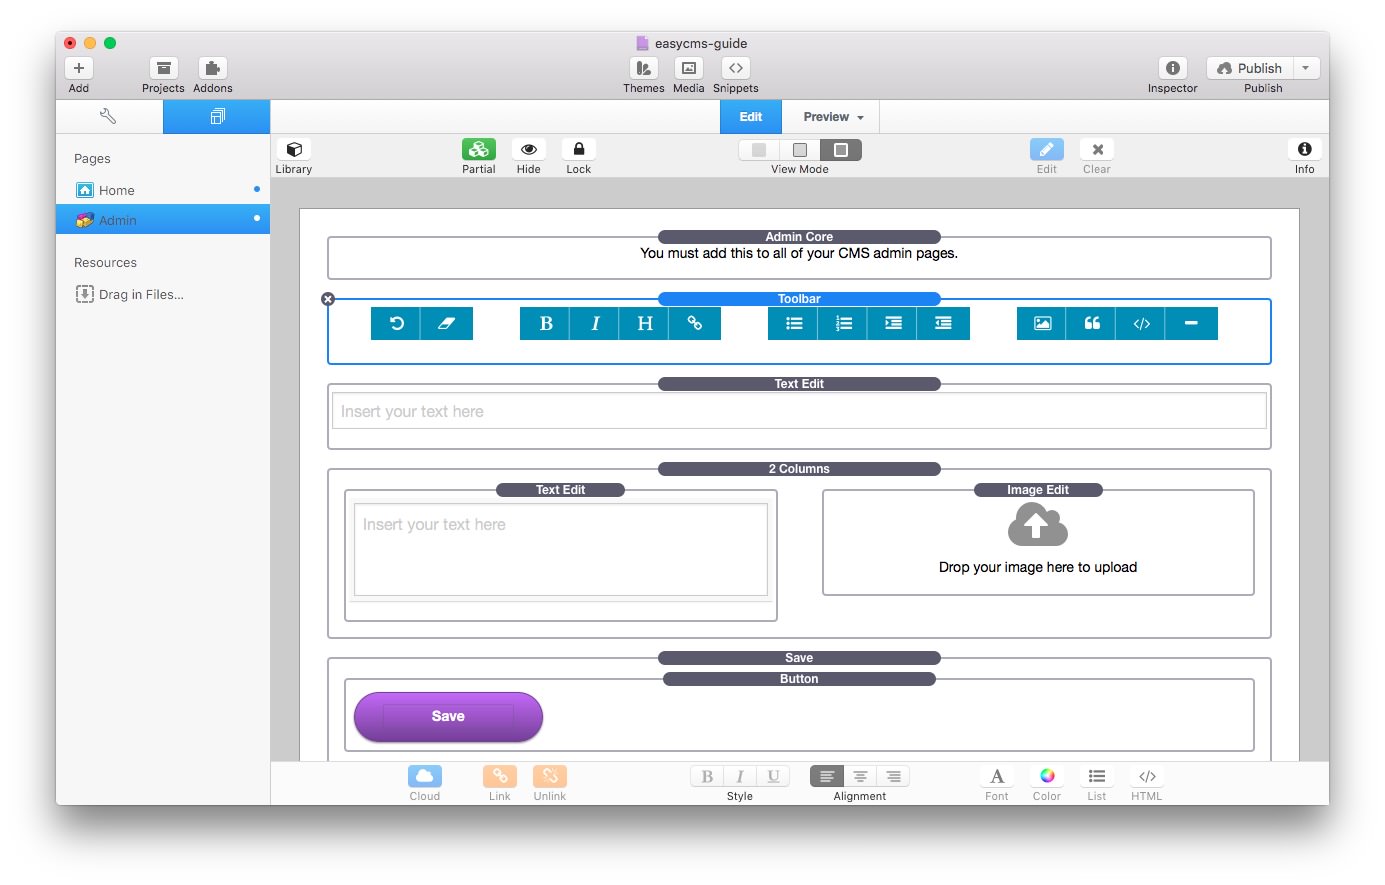
The first thing on any admin page you want to add is the Admin Core stack, every page you want to make an admin page HAS to have this stack on it for the admin page to work. So in our example we will change the CMS IDs for the two text stacks to header1 and paragraph1 and the image stack to image1

After that you can start putting together your admin page. People have different feelings about this, some just want content for people to edit, others believe that yo should make the admin page exaclty like the content page. This is all up to you. For this example, we are going to make the admin page look like the content page. So you need to add a 2 column stack right away. Next you will want to add a Text Edit stack above the 2 column stack (this is for your header stack on the content page). Inside the 2 column stack, add a Text Edit stack in the left column and an Image Edit stack in the right column. When you are done, your page will look like this:

The first thing you want to do for all of your edit stacks (image and text) is to change the CMS IDs to the matching CMS IDs that are on the content page. This is done in the stack settings.

EasyCMS has a very nice feature, in the Text Edit stack settings, you can change the height of the form. This is a nice feature as you can make the spot to edit text as big or as small as you like. In our example, the first Text Edit stack is suppose to be a header stack, and the headers are not suppose to be a lot of text, let's set the form height for that stack to one.

When you do this, your page will look like this:
We know have most of the Admin page done, the last thing that we NEED to add is a save button. You will want to use the Save Stack

You still have to add a button stack inside the Save stack. You can use any button, we have tried it with the Standard Button stack that comes with Stacks, Sweet Button stack by Joe, the Button stack for Foundation by Joe, and the Flat Button stack by Elixirgraphics and they all work. In our example, we are using the standard button stack that comes with the Stacks plugin. Add that to the Save Stack, adjust the button settings to suit your need. You do NOT need to set a link, and if one is set, just delete it and make it the hash symbol (#). As you can see below, we used the standard button stack that comes with the Stacks plugin.

Your page is now set up and ready to go, but we go over the rest of the Admin stacks and talk about what they do.
The first will be the Toolbar stack.

The toolbar stack should be used for people who might have issues using Markdown or just want a simpler way to add the markdown. The Toolbar stack gives you options for your text. In our example project, we are going to put the Toolbar stack above the content.
Now, there are a lot of buttons, and you can turn them on and off in the stacks settings. We will make it a little easier now and explain what each button does. We will go in order of the buttons from left to right.
Rewind - This button will allow the user to go back to the last saved state. So if you are working on something and make a mistake, you can click on the rewind button and it will undo everything you just did (as long as you did not push the save button).
Erase Formatting - If you want to remove formatting from a group of text, highlight the text and click on the erease button and it will go back to normal text. You do have to include the formatting parts of the text as well for them to be erased.
Bold - Highlight text and make it bold.
Italic - Highlight text and make it Italic
Header - Makes the highlighted text into a header. Click this button and it changes your highlighted text into an H3 text.
Link - Makes the highlighted text into a link. This will give you a popup window that you can use to enter the URL for the link.
List - Makes the highlighted text into an unordered list.
Num List - Makes the hightlighted text into a numbered list.
List Indent - Makes the highlighted text into a indented list.
List Dedent - Makes the hightlighted text of an indented list to dedent.
Image - Allows you to add an image into your text. This image has to be hosted on a server and you must know the URL to the image.
Blockquote - Makes the hightlighted text into blockquote text.
Code - Turns the highlighted text into a code block. This is good so if you want to show someone the code but not have the website actually turn it into something on your site.
Line - Add a horizontal line where you click.
Adding Content to the Page
The first thing you should do before adding content to your page, is to publish your site. The information has to be on the server to be able to save the content.
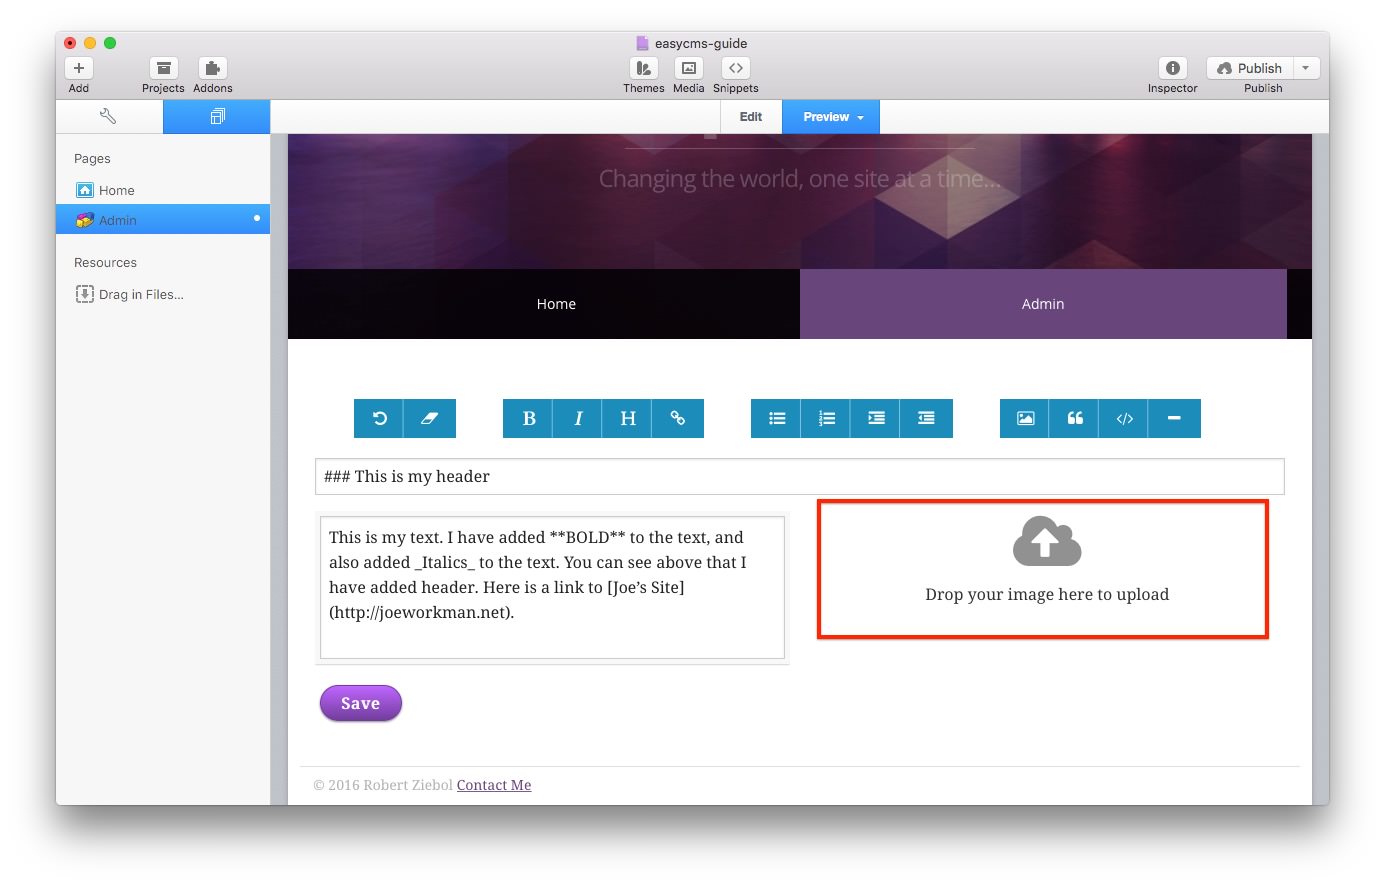
We will use the toolbar to add content to our page. Now, since we are using Markdown, the text will not look corect in edit mode, but the toolbar will add the correct code to the text. Since the first text box is a header stack, click inside of it and then push the H button and it will look like this:

This will add three hashmarks (#) which represent a H3 (or header 3). Now you can type in the text for your header. In our example I am going to type in This is my header. It should look like this:

Now lets type in some text into the paragraph area. I will type in this text: This is my text. I have added BOLD to the text, and also added Italics to the text. You can see above that I have added header. Here is a link to Joe’s Site. Now we are going to change some of the text. First thing is to highlight the word BOLD and click on the B button in the tool bar. Your text should now look like this:

Next we will add Italics around the word Italics. Highlight that word and then push the I button in the tool bar. Your text should look like this:

The last thing we need to do is to make the last words in that paragraph (Joe's Site). Highlight both words and click on the link button. This will bring up a new link window where you can enter the URL:

Now just type in the URL for the link you want and click on the OK button. This will change the text in the paragraph stack to look like this:

When you are done with adding your content, your page should look like this.

You will notice that each text box has a red border around it. This means it is editted text and it has NOT been saved. Now, before you can save your text (yes, you can edit text in the CMS in preview mode in RapidWeaver), you will need to publish your page. Once it is published, you can preview the page in RapidWeaver and make changes in RapidWeaver that are saved to your server. Since I have already published this page, here is what that edited text looks like in preview as you save it.

You will notice that each box now has a green circle with a checkmark in it. This means that content has been saved. Again, staying in preview mode, let's switch back to the content page and see what our text with its markdown looks like:

That is adding text content to EasyCMS. Now lets work on adding an image to that page. Adding images to the page is VERY simple to do. On the admin page, there is a drag and drop area for the image:
There is one thing you can not do in preview in RapidWeaver is drag and drop an image and have it work. It has to either be done on the published page, OR you can preview your site from RapidWeaver in Safari, and it will work that way. Before we actually drag and drop an image on our example, let's look at the image content settings.

CMS ID - This has to be the same as the CMS ID for the Admin Image stack
Image Type - Easy CMS will automatically change your images you upload to the type you select. You can only choose either jpg or png
Size - Easy CMS has 3 different image size options you can choose from to show. The Original Image, the Thumbnail and the Square Thumbnail. Easy CMS automatically makes your image responsive as well, so if your image is bigger than the space provided, it will show up responsively.
Mobile Image - Easy CMS gives you the option to have a different image showing on Mobile if you want. Leave it set to None if you want to use the same image size as you have on desktop.
Align - Easy CMS offers you to align the image Center, Left and Right.
Missing Action - This is a REALLY cool feature of Easy CMS. Once you publish your page, there will not be an image uploaded yet. You can select Easy CMS to either do nothing, hide the missing image (so you do not see the blue ?), or show a default image image that you will need to set up that is already on the server (you will need to know the URL to that image).
Alt - This is the Atl Tag (also known as the Alt Text) for the image. This is very important in SEO. The Import via Easy Text option is the best way to do this, but if you want a custom Alt Tag, there is that option as well. We will go over this more later in this guide.
The last four checkboxes are pretty self explainitory. The only one that might not is Grow to Container Width, this will make the image not have any padding or margins and grow all the way to the left and right of the page (or column if it is in a column like in our example).
Now on to the Admin Image stack.

Let's quickly go over these settings as well.
CMS ID - This has to be the same as the CMS ID for the Content Image stack
Placeholder - On the published or preview page, the instructions telling people where to put the image they are uploading.
Image Type - This is the same as Image Type for the Content stack, whatever you choose for that one, you need to set this one the same.
Preview Size - What size you want the preview of the image to be.
Generate Thumbnails - The next section of settings is VERY cool. Easy CMS does something automatically and that is it will automatically resize your images for you. This is a cool feature as we have had many support tickets where people have used a really huge image size (anything over 700KB is too big) and this will slow their site down. Easy CMS will take those huge images and automatically resize them to what ever max setting you set it to. By default we have it resize the images to a max of 2000 pixels (width or height, which ever is longest), but this can be changed to whatever max size you want. Just be careful as some servers will not accept files over a certain size limit. The other cool thing Easy CMS does (if you leave the check box Generate Thumbnails checked) is make thumbnails of your images that can be used throughout the CMS (more on that coming up). It will make a normal thumbnail of the image and a square thumbnail of the image, and you can even adjust the size of these thumbnails created. By default, they are set to 200px.
OK, now that we have the settings all figured out, lets add an image to our example project. Remember, you can NOT do this INSIDE RapidWeaver. You can preview from RapidWeaver to Safari, or you can visit the published page. For our example, we will visit the published page, which looks like this:

The image I am gong to drop on the page is 2000x1536, so it is a pretty big image. Here is what you will see when you drop an image on the page:
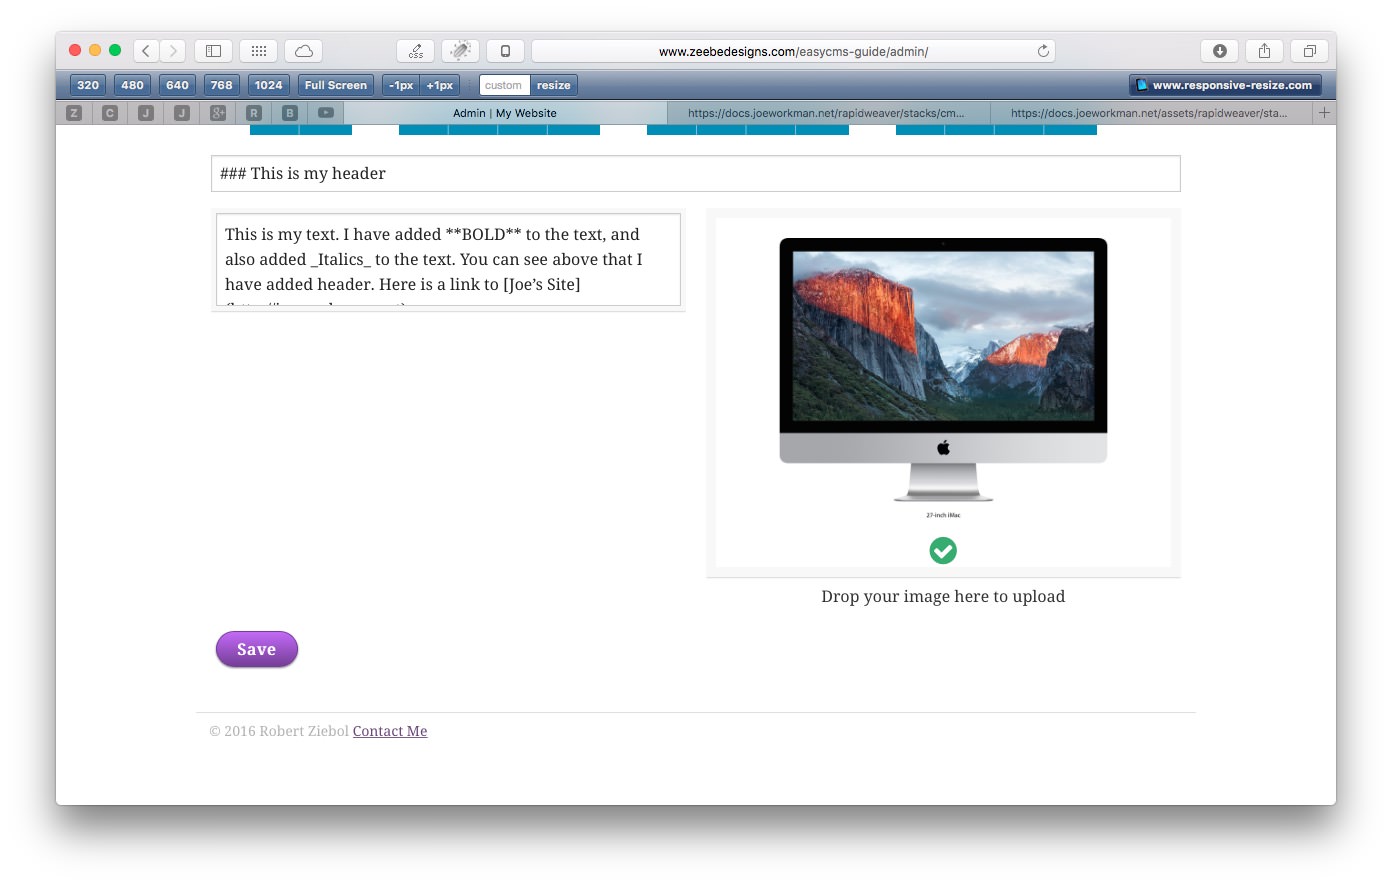
This image is now on the server and can be changed by dragging and dropping another image on the image currently in the admin page. If you want to play with the page that I created, you can do that here:
http://www.zeebedesigns.com/easycms-guide/
and if you want to download the project file, get it here.
These are the basics of the Easy CMS page. You can still do a lot more than this, but this basic understanding will give you a good start. Look for our other FAQs on the more advanced stuff that you can do with Easy CMS like Macros and using it with other developers stacks.
Now go forth and make your websites great!
Deal of the Week
Latest Updates
Latest Live Stream

How to manage use privacy on your website - GDPR, DSGVO, Cookie Laws

{{ title }}
Latest Design

© 2025 Weavers Space | Terms of Service | Privacy Policy